Select a site alphabetically from the choices shown in the box below. Alternatively, browse sculptural examples using the Forward/Back buttons.
Chapters for this volume, along with copies of original in-text images, are available here.


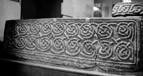
Object type: Sarcophagus
Measurements:
L. 210 cm (84 in); H. 55 cm (21.9 in); W. 90 cm (36 in)
Wall thickness: Irregular, but typically 14–16 cm (5.6–6.3 in)
Stone type: Greyish orange pink (5YR 7/2), poorly sorted, clast-supported quartz sandstone; a few pink feldspars are present. The sub-angular to sub-rounded grains range from 0.3 to 1 mm across, but are dominantly in the range 0.4 to 0.6 mm. Most clasta are quartz, but there are some of white feldspar. Millstone Grit Group, Carboniferous (C.R.B.)
Plate numbers in printed volume: Ills. 166–75
Corpus volume reference: Vol 13 p. 170-172
(There may be more views or larger images available for this item. Click on the thumbnail image to view.)
Decorated externally on all vertical sides; the base is plain but dressed, as is the hollowed-out interior. The corners are rounded and the sides slightly convex. The decoration on each side (and intervening corners) is contained within panels surrounded by two mouldings: an outer broad flat moulding, which appears to be slightly rounded, probably with wear; and an inner thin roll moulding. There is a slight taper outwards from the base to the top.
The corners are decorated with interlace patterns. That between B and C is a simple mirrored two-stranded plait with round loops divided by a central moulding which bifurcates about two-thirds of the way up; the pattern becomes jumbled where it narrows towards the base. That between A and B is a two-stranded, mirrored, turned interlace pattern, the lower loops of which are squared; it too is divided by a bifurcating central moulding. The corner between A and D is also a mirrored two-stranded, turned, interlace pattern, with pointed lower loops, separated by a bifurcating central moulding; it appears less well accomplished than the others, possibly due to greater wear. That between C and D is, again, a mirrored, two-stranded interlace, with round lower loops, divided by the bifurcating central moulding.
A (broad): Decorated by a continuous complex spiral interlace pattern formed of two parallel, horizontal rows of round spirals with the outer ends of each spiral crossing over to the opposite row and the inner end of each spiral joining with the next one along. At each end the pattern terminates by the inner strands of the spirals on the upper and lower rows being linked together.
B (narrow): This face contains a complex interlace pattern composed of turned loops which produce the effect of four encircled motifs, interlinked by diagonal strands passing through the centres of the four encircled patterns. One of the diagonal strands terminates on the bottom left-hand side by linking into the inner roll moulding.
C (broad): This face contains a series of vertical half patterns of interlace which are not uniform across the panel. Some of the loops are circular and some are turned; some are three-stranded but others include two-stranded motifs. On the left, the pattern forms a closed circuit, single-strand loop with the second and third strands crossing as diagonals. On the right, the pattern changes, using a series of two-stranded plaits.
D (narrow): This face contains a turned pattern of complex interlace comprising two rows of three-stranded plaits, linked together by diagonal strands crossing from one row to the other.
The sarcophagus (7a) and its fragmentary lid (7b) form an outstanding monument from the Anglo-Saxon period. Being decorated on all sides (and its lid) suggest that it was intended to be displayed above ground, perhaps as a shrine or the stone casket of an important person, venerated after death. It is possible that it was a Roman stone coffin, reused, redressed and decorated during the Anglo-Saxon period, but the form of the lid might argue against this, as might the slightly tapering form of the body of the sarcophagus. The decoration is interesting in that it is not uniform, the sculptor using different forms of interlace even on the same panel (see C). However, each face, along with what survives of the lid, gives an overall impression of visual uniformity. Even though the sarcophagus is a rare survival of the period, the execution of its carving is not outstanding in terms of precision. The varying interlace types, and areas of irregularity, might suggest that either more than one sculptor was involved in its manufacture, or that a certain amount of experimentation or license was applied by a single sculptor.
The anonymous, pre-Conquest compilation of saints’ resting places indicates that Alkmund was interred at Northworthig in the ninth century (Rollason 1983, 4; Blair 2002b, 511). Radford (1976, 45–6) was thus certain that the sarcophagus was indeed that of St Alkmund, considering that it could only be a shrine intended to venerate a saint. However, there is no evidence to link the monument to any one individual, nor dating evidence to even place the sarcophagus in a ninth-century context. Derby was an important centre during the Viking period, a proto-town which developed close to the old estate centre of Northworthig and no doubt became a centre of power in the north Midlands, even after the Scandinavian settlement. As such, there were undoubtedly numerous individuals who would have commanded a high status burial such as that exemplified by the monument under discussion. Alternatively, it is possible that the sarcophagus could have been the shrine of St Alkmund, produced during the revival of the saint’s cult during the course of the later tenth or early eleventh century (see Derby 3). The enclosure of the saint’s relics within an Anglo-Scandinavian set of design elements may have been an attempt to visually associate the saint with the Scandinavian elite.
