Select a site alphabetically from the choices shown in the box below. Alternatively, browse sculptural examples using the Forward/Back buttons.
Chapters for this volume, along with copies of original in-text images, are available here.


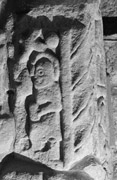
Object type: Part of shaft [1]
Measurements: H. 48 cm (18.8 in); W. 28 cm (11 in); D. 26 cm (10.25 in)
Stone type: Poorly sorted, greyish orange to very pale orange (10YR 7/4–8/4) feldspathic sandstone. The angular clasts vary in size, commonly up to 2 mm diameter. Kinderscout Grit or Ashover Grit, Millstone Grit Group, Carboniferous (R.T.)
Plate numbers in printed volume: Ills. 41–2
Corpus volume reference: Vol 13 p. 123-124
(There may be more views or larger images available for this item. Click on the thumbnail image to view.)
The outer vertical edge of A / D is bounded by a thin roll moulding abutting a well-formed and distinctive cable angle moulding of the same type seen on Bakewell 12, being formed of strands set at an angle and marked by a central concave depression.
A (broad): Contains the remains of a figural group centred on a forward-facing figure, half of which is now lost in the vertical break in stone. The remainder consists of the left shoulder and arm bent across the body at waist height, with a staff-cross held over the left shoulder. To the right stands a second, profile figure with a curved moulding surrounding the head from the nose to the base of the skull. The eye is deeply drilled and outlined by an incised circle. The left shoulder is well formed and the arm, bent at waist height, crosses the body to hold a square object before it. The robe ends in drooping hemline at mid-calf length. Although the carving is sheared off at this point, the feet survive, in profile, facing the central figure. A prominent pellet fills the space above the head of the profile figure, between the staff-cross and the inner roll moulding.
B (narrow): Contains the remains of two profile figures standing in a ladder-like framework, facing a central vertical moulding and grasping ‘fronds’ emerging from it. The upper figure, whose head and shoulders are lost in the upper break in the stone, wears a knee-length robe with a drooping hemline. The feet, in profile and turned to the right, stand on the horizontal moulding that extends from the central divide but ends short of the plain inner moulding. He grasps the frond emerging from the central vertical moulding with an arm that extends across his body at waist height. The lower figure, whose head and torso only remain above the lower break in the stone, has the same outline round his head as the profile figure on A, and the same deeply drilled eye surrounded by an incised circle. His arm bends across his body to grasp the frond emerging from the central divide. To the right are the worn remains of further carving: slightly below the horizontal moulding on the left, there seems to be a similar feature extending to the right, with a foot resting on it and a leg extending up to the tip of a short skirt. A frond may also have extended to the right from the central moulding, above this skirt.
C (broad) and D (narrow): Broken
The figural details link this piece with Bakewell 12 and 16 (Ills. 33, 44), displaying as they do, the distinctive profile figure with the double outline round the head, the incised line round the eye, and the scalloped hemline and slightly drooping corners of the short tunics. These pieces are also linked by the common detail of the distinctive cable angle moulding combined with the plain inner roll-mouldings. As noted (Bakewell 12) these are all details associated with Sandbach Market Square 1, Cheshire (Bailey 2010, 99–113).
The three-figured group once featured on A, centred on the forwards-facing figure with a staff-cross and the pellet prominently placed over the head of the flanking, book-bearing profile figure, are also details common to Sandbach where they feature in the Transfiguration scheme of Sandbach Market Square 2 (Bailey 2010, 113–22, ills. 287, 291: see Ill. 643); this, in turn, is closely related to the same scene on Sandbach Market Square 1, although here Christ does not bear a cross (Bailey 2010, ills. 266, 267). Likewise, the scheme on B, consisting of profile-figures standing on horizontal mouldings not contiguous with the outer frame, and grasping fronds extending from the central vertical moulding, is also featured at Sandbach Market Square, on both 1B, 2B and 2D (Bailey 2010, ills. 253, 259, 286). It is a distinctive scheme found only on Bakewell 15 and the Sandbach monuments (Ill. 644). Together, these details confirm that Bakewell 15 (like Bakewell 12 and 16) emerged from the centre responsible for Sandbach Market Square 1 and 2, and that they are, in all likelihood, contemporary with those monuments, which are dated, in the case of Sandbach Market Square 1, to the early ninth century, and in the case of Sandbach Market Square 2, to the first half, or mid-ninth century (Hawkes 2002a, 137; Bailey 2010, 99–122). While the cross held by Christ on Bakewell 15A links the carving more closely to Sandbach Market Square 2, the scheme of 15B that figures on both Sandbach Market Square 1 and 2, the proportions of the figures and the use of the cable and inner roll mouldings to contain the schemes, overall associate it more closely to Sandbach Market Square 1, suggesting that this piece may well represent the remains of a further monument from Sandbach, that was produced between the early / middle of the ninth century, possibly at some point in the second quarter of that century (Bailey 2010, 99-113).
Comparison with the schemes at Sandbach also provides some understanding of the identity of the figures preserved on Bakewell 15. The close relationship of the scheme on A to the Transfiguration scenes at Sandbach indicate that it too may have illustrated that scheme, the staff-cross held by Christ, functioning, as it does on Sandbach Market Square 2, to link the Transfiguration with the Second Coming (Hawkes 1995a; 2002a, 33-4). However, unlike the Sandbach Transfigurations, the Bakewell group does not depict the profile figure (to the right), bearing the scroll signifying the Word of the Prophets, held by Elijah in such scenes; nor is the bird of the Holy Spirit depicted above this figure as it is at Sandbach. This could, however, be explained by the possibility of setting Moses (depicted on the left at Sandbach), on the right: Moses in both scenes clasps the book of the Law. In the iconography of the Transfiguration the positions of the Old Testament figures could, and did vary in relation to Christ. Alternatively, given that those responsible for carving the Sandbach scenes attempted to render the Word of the Prophets more coherently on Sandbach Market Square 2, the depiction of this symbol as a book on Bakewell 15 may represent a further attempt at clarity, the book being more easily discernible than the scrolls otherwise featured.
The scheme preserved on B is less easy to identify, but it has been argued (Hawkes 2002a, 64-75; Bailey 2010, 111), that it relates to the spiritual life of the Church that (based on Ephesians 3: 17-19), involve the theme of ‘ascension’ to the heavenly life by means of a metaphorical ladder and the Tree of Life. In this context the cross of the crucifixion is viewed both as tree and ladder, as the means by which the Christian soul ascends to heaven, the ascent in spiritu being accompanied by the plucking of the fruit of eternity. Given the manner in which the Bakewell scheme replicates those preserved at Sandbach, it is not unlikely that it too was intended to convey ideas associated with the Tree of Life and the Spiritual Ladder, here being identified with the cross on which it is carved (cf. Bintley 2013).
