Select a site alphabetically from the choices shown in the box below. Alternatively, browse sculptural examples using the Forward/Back buttons.
Chapters for this volume, along with copies of original in-text images, are available here.


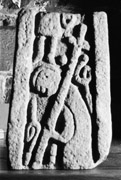
Object type: Part of shaft
Measurements: H. 51 cm (20 in); W. 32 > 28 cm (12.6 > 11 in); D. max. 17 cm (6.75 in)
Stone type: Pale red (10R 6/2), moderately sorted, medium-grained sandstone with the sub-angular to sub-rounded clasts ranging from 0.3 to 0.5 mm. The colour is suggestive of the Helsby Sandstone Formations, Sherwood Sandstone Group, Triassic, rather than the Millstone Grit Group (C.R.B.)
Plate numbers in printed volume: Ills. 569–74
Corpus volume reference: Vol 13 p. 298-299
(There may be more views or larger images available for this item. Click on the thumbnail image to view.)
The surviving edges are all bounded by a wide flat angle moulding.
A (broad): The decoration consists of the remains of two figures. The lower portion of one, wearing a knee-length robe, survives below the upper break; the feet are turned out to each side, immediately above the head of the second figure. This fills the remainder of the panel, the body rising vertically from the lower break, along the angle moulding on the right, to bend sharply so that the head lies against the angle moulding on the left. The head, seen in profile, has a deeply drilled eye, incisions mark the profile nose and mouth, and a double outline surrounds the head from the nose to the base of the skull. The left arm forms a sweeping curve, to grasp a staff-cross that extends up from the lower edge of the stone to pass over the shoulder and terminate alongside the upper figure. Next to this (upper) figure, and above the cross-head, is a small circular motif. Above the bent back of the cross-bearing figure, and on either side of the staff-cross is a pellet, which, on the right, is accompanied by a strand of interlace that loops round on itself once, and extends down to terminate in a spear-shaped terminal. A similar motif fills the space between the figure’s hand and the lower part of the staff-cross. The remains of a third spear-shaped terminal lies below the figure’s arm.
B (narrow): The face is filled with a length of half pattern C interlace (Cramp 1991, fig. 22), but the angle moulding and part of the interlace have been dressed back on the right-hand side.
C (broad): Cut back and dressed off
D (narrow): In its upper half, the face is filled with a length of four-strand plait with cross-joined terminals below. This abuts a simple pattern E trefoil knot set above what may be the curved tail of a serpentine animal, which encloses a second trefoil set on its side with long pointed terminals. A linking strand joins the two knots. As with B, the left-hand side has been dressed back.
As has often been noted (Plunkett 1984, 135–6; Hawkes 1989, 357; Hawkes 1998, 41; 2002a, 139), the decoration of this shaft fragment bears indications of having been derived, stylistically and iconographically, from the carved programmes preserved on Sandbach Market Square 1 in Cheshire (Bailey 2010, 99–113). As well as the figural type discussed below, an animal with its tail forming trefoil knots is found at Sandbach, and also on Checkley 2B (Ill. 527), which reinforces the suggestion that the same decoration may have been used here on D.
In addition, the figural carving on A presents a series of motifs that associate the piece with others that have survived in the region: on Bakewell 14 (and Hope 1), in Derbyshire, for instance (see Chesterton 1, p. 281, Ill. 533). The pellets flanking the cross are found on these carvings, as well as Sandbach (Bailey 2010, 99–125), and are also found across the region, at Alstonefield (2), Checkley (1 and 2) and Ilam (Estate 1) in Staffordshire. Furthermore, the cross-bearing figure, like that at Bakewell (and the sword-bearing figure of Hope 1, Ills. 40, 214), is shown in profile, with his head and shoulders curved at a steep angle behind the staff-cross held across his shoulder, while his head bears the characteristic double outline that likely derives from attempts to depict a profile head with a nimbus (Hawkes 2002a, 33–4), and which is repeated across both Sandbach Market Square 1 and 2 and their derivatives in the churchyard, Sandbach St Mary’s 1–5 (Bailey 2010, 99–125). At Leek, however, the cross-bearing figure is not isolated in a panel, as is the case at Hope and Bakewell; rather, he is surrounded by looped strands terminating in a spear shape that identifies them as serpents. This has allowed the scheme to be explained as a version of the Road to Calvary preserved on Sandbach Market Place 1, but adapted in keeping with the well-established iconography of Christ Triumphant, trampling the beasts, which usually include at least one serpentine creature (see Chesterton 1, p. 281; Hawkes 2002a, 139–40).
The identity of the figure whose remains survive above the cross-bearing figure cannot be ascertained, but the circular object held at his side, above the head of the staff-cross, might be associated with wreaths that accompany late antique images of triumph and victory, and which were adapted in an Anglo-Saxon context, at Rothbury in Northumberland in the late eighth century (Hawkes 1996; 1997d; see also Cramp 1984, 217–21), as symbols of the majesty and power of Christ.
Clearly this cannot be ascertained at Leek, but the extant details of the cross-bearing figure in association with the serpentine creatures flanking him, do indicate the presence of a scheme signifying the victory over death accorded by Christ’s crucifixion. Production within the context of an ecclesiastical centre with access to model types lying behind those used at Sandbach, thus provides the most convincing milieu for the monument.
