Select a site alphabetically from the choices shown in the box below. Alternatively, browse sculptural examples using the Forward/Back buttons.
Chapters for this volume, along with copies of original in-text images, are available here.


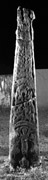
Object type: Shaft with remains of cross-head
Measurements: H. 224 cm (88.2 in); W. 44 > 19 cm (17.3 > 7.5 in); D. 22 > 9 cm (8.6 > 3.5 in)
Stone type: Graded pink (5YR 8/3), but yellowish in places, poorly sorted, feldspathic sandstone, varying in grain-size from 0.1–1.0 mm. Scattered, very well rounded, clasts of quartz up to 15 mm across occur. Some of the larger clasts are of dark shale up to 6 mm across; others are of distinctly angular feldspar. Helsby Sandstone Formation, Sherwood Sandstone Group, Triassic (C.R.B.).
Plate numbers in printed volume: Ills. 547–50
Corpus volume reference: Vol 13 p. 288-290
(There may be more views or larger images available for this item. Click on the thumbnail image to view.)
A (broad): This face is decorated at the bottom with three figures standing side-by-side within an arched panel. They are badly worn so that detail is lacking but the central figure and probably that on the left have raised arms; that on the right is too badly eroded to ascertain whether it too had its arms raised. All three appear to have worn long robes but any surface detail (such as plait-work or drapery folds) has worn away. Legs extend below the robes of all three figures, but the details of the feet have been lost. The outer edges of the flanking figures have been worn away, along with the edge mouldings at this point of the shaft. The arch above the figures appears to have been decorated, perhaps with a pellet design although, again, it is too eroded to be certain.
Above the arch is an interlace pattern that apparently takes the form of two registers of concentric rings, two in the upper and three in the lower, linked by a turned loop design with two paired strands on either side of the damaged area in the centre (closed circuit pattern C: Cramp 1991, fig. 24). The loops return sharply, to form a point at the lower terminal of the pattern. However, the pattern is again badly worn, especially at the top, so that the details are unclear. It is further interrupted by a diagonal break in the stone and a vertical groove where an iron tie was once inserted to hold the shaft together. The remains of what appear to be roll mouldings are visible on each side. The panel is bounded above by an arch which is so badly worn that only the top and bottom incisions are now visible.
Above the arched panel containing the mirrored pattern is another interlace design. However, this part of the face is especially eroded and worn so that almost all detail has been lost. The surviving decoration comprises a central incised divide and fragments of interlace visible on either side, of which enough remains to suggest that it too once formed a mirrored pattern, probably paired Stafford Knots (complete pattern E: ibid., fig. 14). The upper part of the pattern has worn away to the upper break in the stone, over which is the fragment that was broken off and cemented back in place. The decoration on this fragment is very badly eroded but appears to have presented some form of interlace, possibly simple pattern F (ibid., fig. 23). Rolled edge mouldings are visible on each side. There are deep, worn grooves on either side of an area which now comprises a series of undulations in the surface of the stone with two holes drilled in the centre. It is not clear whether these were once part of the decoration, or (more likely) have been made through possible reuse or restoration of the stone.
On each side a curved moulding springs out from the edge moulding at the point where, on the right-hand side, a protuberance indicates the beginnings of a cross-arm, part of an armpit being still visible. However, most of the latter has now been broken away and any decoration has been eroded off. All that remains on the left of a former cross-arm is a small piece of curved moulding suggesting that the stone turned outwards at this point.
B (narrow): This face is decorated at the bottom with a single figure set within an arched panel framed by worn (roll) mouldings; the arch is formed by two such mouldings. The figure itself is eroded and detail has been lost, but it appears to wear a full-length robe decorated with an interlace or plait-work pattern. The right arm is very worn but it seems to grasp a vertical staff or rod, or possibly a spear; the tip is too badly worn to discern the nature of the terminal. A hole has been drilled into the centre of the staff as a result of later reuse or reconstruction. The neck of the figure is long and broad and rises to a head which appears to be relatively large with a rounded oval-shape. All facial details have been worn away and it is unclear if it wore some form of head-dress or was surrounded by a halo.
Above, is an arched panel of mirrored turned interlace pattern composed of four strands forming a series of Stafford Knot V-bends (simple pattern E: ibid., fig. 23). There are three crossings although two of them have been damaged by two securing pins (from restoration attempts) and a diagonal break in the stone. The mouldings on each side of the pattern appear to have outer edge mouldings, but these are very eroded. The arch bounding the upper edge of the panel is doubled, like that below.
Above, is a four-strand interlace pattern that terminates in a returned loop and two strand ends at the bottom (simple pattern F: ibid., fig. 23). It rises within a tapering panel with the upper portion of the interlace becoming less distinct through wear and erosion. There are rolled edge mouldings on each side and a double arch above, although the latter is badly worn. Above, is a break in the stone, above which the decoration is all but worn away; it appears to have formed an interlace or plait of indeterminate design. The top of the shaft is broken off but the spring of a cross-arm and arm-pit are visible close to the top.
C (broad): At the bottom of this face is a panel framed by a double arch at the top and a horizontal wide band moulding at the bottom. This contains a rather indistinct scheme that can nevertheless can be identified as comprising at least one bird, set in profile on the left of the panel; its head and beak are turned to the centre, and its body with folded wing fills that side of the panel and terminates above a branch protruding from the base of the panel up towards the centre, bifurcating below the body of the bird; a series of small pellets/berries lie below. Next to the head of the bird, below the centre of the arch framing the panel, is a small triangular feature, too indistinct to interpret, and to the right are a series of elements that probably comprise the remains of a further bird, confronting that on the left. Below, in the triangular-shaped field between the two is a triangular-shaped piece of carving, apparently an interlaced trefoil with leaf-shaped terminals.
Above, are two closed-circuit interlace patterns contained within an arched panel with worn rolled edge mouldings at the sides. They are worn and some detail is missing but they appear to comprise three concentric rings in the lower register and two in the upper, with a two-strand simple pattern extending diagonally through the rings and crossing in the centre (closed circuit pattern C: ibid., fig. 24). The strands terminate in pointed loops at the bottom of the panel and seem to thread under the double moulded arch at the top. The two patterns appear to be linked by extensions to the interlaces, although there is a diagonal break in the stone at this point. This appears to be a better preserved version of the same pattern that appears on A above the figure panel.
Above, is a further arched panel with double arch mouldings springing from rolled edge mouldings, containing a turned complete pattern of interlace of probably six strands (although detail is worn) with V-bends. As on A, the interlace comprises a series of Stafford Knot designs of which there are three registers (simple pattern E: ibid., fig. 23). The upper part is decorated with an interlace which appears to have four strands although this part of the stone is badly worn and eroded and the detail is unclear, but possibly simple pattern F, as on A in this position. The arms of a cross-head can be seen springing from the left-hand side where an arm-pit is visible, and the interlace appears to extend along the cross-arm although this is uncertain. The top of the stone is both broken and badly eroded.
D (narrow): This face is filled at the bottom by a panel bounded at the top by a double moulding arch containing an irregular interlace although it is badly worn and detail is lost. The top of the interlace appears to terminate in a stylised plant-scroll of three leaves but, again, this is badly worn and difficult to distinguish. The edges of this face and the interlace panel are worn away.
Above, is a complete mirrored interlace pattern which appears to be a turned loop design of four strands on each side, similar to that on B with a series of Stafford Knot registers (simple pattern E). However, the upper part of this pattern is truncated by a diagonal break in the stone, a groove cut during restoration of the shaft, and extensive erosion so that the upper part of the interlace is almost indistinguishable. A double arched moulding at the top of the panel can just be discerned. The upper half of this face appears to have been decorated with interlace although it is so eroded and worn that detail of the pattern has been lost. At the top the broken spring of a cross-arm can be seen although all decoration in this area is now missing.
This monument is a near-complete, rectangular-sectioned cross-shaft which bears the remains of a cross-head on its upper portion in the form of partial armpits on each side. The bottom of the shaft is buried in the ground to an unknown depth but the decoration, worn though it is, appears to be complete at the bottom.
Despite the wear and erosion the cross displays a large array of design elements making it a complex and informative monument. There are distinct similarities with at least one of the shafts at Checkley (1). The figural scene on A, for instance, which comprises three figures with upraised arms, standing side-by-side and wearing long robes, with that in the centre being taller than the others, is reflected on Checkley 1A and 1C, as well as Ilam Estate 1. The plaitwork design on the robe of the single figure on B, although worn, is also reflected on Checkley 1 and Ilam Estate 1.[1] The use of double mouldings springing from the edge moulding to articulate the arched panels containing the decoration is also found on these monuments, while the variety of interlace patterns are also reflected at Checkley. The mirrored interlace pattern featured on all faces of this piece are found on Checkley 1B, including that with a double strand (on C on this piece). This may also be reflected at Ilam Estate 1, but this is unclear given the very badly eroded condition of the decoration there. The closed-circuit design on C and less clearly on A is also found on Checkley 1C, and appears to be present below the figures on Ilam Estate 1D. The same design is found on Norbury 1A, which, like Checkley and Ilam is located either in the Dove Valley or its tributaries. Similarly, Norbury 2A, is decorated with a mirrored interlace pattern in the same style as Ilam 1C and Checkley 1B. These points of coincidence strongly indicate that, like the sculptures at Norbury, Checkley and Ilam, this monument can be dated to the later ninth or more likely, tenth century.
