Select a site alphabetically from the choices shown in the box below. Alternatively, browse sculptural examples using the Forward/Back buttons.
Chapters for this volume, along with copies of original in-text images, are available here.


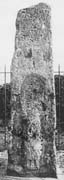
Object type: Cross-shaft (the 'Lypiatt Cross')
Measurements:
H. 179.6 cm (69.4 in);
W. (face A) 52 > 35.2 cm (20.4 > 13.8 in); face C) 52 > 38 cm (20.4 > 14.9 in);
D. (face B) 36.4 > 27.2 cm (14.3 > 10.7 in); face D) 36 > 27.6 cm (14.1 > 10.9 in)
Stone type: Yellowish grey (5Y 7/2) shelly oolite with grains supported by sparry matrix. Ooliths range between 0.2 and 0.6 mm in size and are commonly hollow. Shell debris mainly between 1 to 3 mm but some up to 10 mm. Finely laminated bedding parallel to face of shaft with signs of cross-bedding. Probably White Limestone Formation, Great Oolite Group, Middle Jurassic.
Plate numbers in printed volume: Ills. 54-7, 60-6; Figs. 16, 33A-C
Corpus volume reference: Vol 10 p. 143-5
(There may be more views or larger images available for this item. Click on the thumbnail image to view.)
The provenance of the Lypiatt Cross has recently been the subject of a detailed study (Jones 2007, 18–50). It now seems unlikely that the stone is in its original position, as suggested by Bryant (1990, 44–6). A stone is first reliably recorded in the present location in a perambulation of October 1822 (Jones 2007, 46, citing Gloucestershire Archives, P47 VE 2/4); at this date there seems to have been a need to establish a clear boundary between Bisley and its former chapelry of Stroud. Jones argues that it is likely that the stone had been erected in its present position not long before this date. He also considers that the most likely previous location was a little further to the north, adjacent to Hanstead's Tyning on Catswood Lane (Jones 2007, 44–50). However, this origin is not established by any direct evidence, and it may be that the stone derives ultimately from Bisley churchyard.
Cross-shaft cut from a single block of limestone. Each face is divided into two or more panels, the lowest of which contains a tall figure below a round-headed arch. Observations in 1929 indicate that there is a circular tenon hole in the base c. 18 cm (7 in) in diameter.
A (broad): The figure stands on an octagonal or hexagonal dais, facing forward with both arms raised. The left arm bends at an extremely awkward angle but because the lower arm and hand are missing, it is difficult to interpret. The right arm is, however, well carved, the cuff sagging naturalistically to show the wrist, and the right hand raised in blessing or exhortation. The feet point downwards and between them stands a vertical shaft. This could be interpreted as a stake or cross to which the figure is bound, or the support for a lectern in front of which the figure is standing. The figure's head is missing and, where it should be, there is a square socket. This may be a later feature, but it is perfectly placed to act as the setting for a replacement head or even for a separately carved original — possibly using finer-quality stone. The figure is clothed in a long tunic that reaches to the ankles, but few surface details survive. From the shoulders fall the folds of a cloak and within the folds, outlining the body, are rows of drilled holes. There are eight holes on the figure's left side and four on the right and they are all approximately 5 mm in diameter and 4 mm deep. These are clearly part of the original design and not part of some later reuse (see the discussion below). The arch above the figure's head is stilted and rises from square imposts set on responds which formed the edge moulding of the shaft. Above the imposts the inner edge of the extrados is chamfered. To the figure's right the spandrel is slightly recessed. Directly above the centre of the arch, a vertical slot has been cut. If this is contemporary, it may have carried a decorative boss. Above the arch, the rest of the shaft has been planed away to take a later inscription, and all that remains of the original design is the stepped border of a second panel with the lower part of a possible figure set slightly off centre.
B (narrow): This is the most badly weathered and damaged face of the shaft. The whole of the top half has been cut back and carries the letters BP and OL. The soffits of the arch imposts are just discernible above the presumed position of the figure's head, while, of the rest of the figure, only the feet and the lower part of the body remain. This is, however, enough to show that the figure is turned to the right and wears a long tunic, well modelled in deep folds. To the figure's left the folds of the tunic run into the heavily weathered, natural laminations of the stone, making it difficult to disentangle any details, but it is possible that the figure wears a light cloak.
C (broad): This face is also badly weathered but details of the upper and lower panels survive. The main figure appears to be frontal and may be seated. It is impossible to be certain because the lower part of this face is missing. The figure's head is missing. The right arm is folded across the chest, and the left is extended to support a large rectangular object. This feature is very badly worn, but the way in which the figure is holding this object may indicate that it is a reliquary or a donor's model of a church. Above the figure, a wide semi-circular arch springs from square imposts. The extrados of the arch is slightly chamfered and the spandrels are recessed. The lower panel is divided from the upper panel by a broad border, in which is cut a circular socket. The placement of the socket, off-centre in both horizontal and vertical planes, suggest that this may be a later feature. The upper panel contains a complex pattern of interlace. Its condition will not allow it to be fully resolved, but at least part appears to be an encircling design with diagonal elements.
D (narrow): This is the best preserved face and is split into three panels. The main figure, a man with 'bobbed' hair and a short beard, stands facing left with his head tilted back looking upwards. The figure's right arm is bent at the elbow while in his left hand he holds up a book. The sleeves are particularly well carved with wide cuffs hanging in deep folds. The figure wears a long, ankle-length tunic, and the folds betray a fine understanding of the body underneath. The whole figure is beautifully proportioned and graceful, showing observation and carving skills of the highest order. Above the figure's head a semi-circular arch springs from heavy, slightly chamfered imposts. The extrados of the arch is chamfered and the spandrels are recessed. A broad border separates the figure from the next panel, in which stands a single figure with a cloak pulled up over its head. A narrow border in turn separates this figure from a third panel in which the feet alone survive of another figure. This top panel cannot have been much less than 50 cm deep and therefore it is possible to suggest that at least 17 cm of the shaft is missing.
The rows of drilled holes on either side of the figure on face A are clearly part of the original design. It has been proposed that they might belong to a symbol of some kind, such a St Lawrence's gridiron (Baddeley 1929, 106–7). The holes could also be the fixing points for metal strips used to depict criss-cross binding, if the figure was bound to a stake. However, both of these suggestions would surely involve the disturbance of the even folds of the cloak, and it seems more likely that the holes were used to secure engraved metal strips applied as decorative edging or as a stole. The use of metal detailing on stone sculpture was a common feature of the Roman period and has been suggested for the north cross at Sandbach in Cheshire (Hawkes 2002, 146–7, fig. 5.7; Bailey 2010, 25–6) and the Reculver cross-shaft in Kent (Peers 1927, 254–5; Kozodoy 1986, 70–3; Tweddle et al. 1995, 151, 156–7, ills. 113–16). It is possible that the square socket mentioned earlier in the description was cut not as a fixing point for the head but for a halo that was also made of engraved metal. The overall effect would have been similar to the Tassilo Chalice (Webster and Backhouse 1991, 168, ill. 131).
The figures on the Bisley Lypiatt 1 cross-shaft have been compared to those on the great Northumbrian crosses at Ruthwell and Bewcastle. This suggestion was supported by specific comparisons in Bryant (1990, 41–2). However Bryant (the present author) also pointed out that the Lypiatt shaft differs from the others in having major figures on all four faces, and that the Lypiatt carver seems to have set out to created a unified design which spreads across at least three faces of the cross in the form of a triptych. The figure on face D gazes upwards in the act of offering a book, presumably indicating that he is an Evangelist (see Fig. 16, p. 48). He is not, however, intended to be seen in isolation, but, together with the figure on face B, he turns to support the figure on face A. Bryant suggested that the theme portrayed might be that of Christ the Teacher, with the central figure wearing some of the garments of a contemporary cleric and supported by the Evangelists as disseminators of the Word. This interpretation has also been proposed for the lower tier of figures on the Reculver cross, Kent (Kozodoy 1986, 70, fig. 3, pl. XXXI). This theme would seem to be particularly appropriate if the Lypiatt shaft was originally a preaching cross. The figure on face C may also be linked, representing perhaps Christ in Majesty or Christ in Judgement holding the Liber Vitae. Alternatively the figure on face C might be that of a donor holding a reliquary or model church to denote his support of the church — perhaps even the nearby church of All Saints in Bisley that was in all probability an early minster (Hare 1990). Bryant suggested that the figures on the Lypiatt Cross are so similar to the Ruthwell and Bewcastle figures that a similar eighth-century date could be supported. Even the panel of interlace is similar to a panel on face B of the Bewcastle cross, Cumberland, described as a single register of double-strand complete pattern C interlace (Bailey and Cramp 1988, 64, ill. 101). Further study, associated with the compiling of this volume of the Corpus, has tended to reinforce this suggested date and the unique quality of the Lypiatt carving.
