Select a site alphabetically from the choices shown in the box below. Alternatively, browse sculptural examples using the Forward/Back buttons.
Chapters for this volume, along with copies of original in-text images, are available here.


Object type: Incomplete shaft, in three fragments [1]
Measurements: H. 302 cm (120.5 in); W. 64 > 46 cm (25 > 18 in); D. 47 > 30 cm (18.5 > 12 in)
Stone type: (Only the lowest stone examined): yellowish grey (5Y 7/2), fine- (0.2 mm) to very coarse-grained (up to 1.5 mm), but mostly coarse-grained in the range 0.6 to 0.9 mm, angular to sub-angular, clast-supported quartz sandstone. Millstone Grit Group, Carboniferous
Plate numbers in printed volume: Ills. 244-5, 262, 273-6, 279-80, 283-92; Fig. 18
Corpus volume reference: Vol 9 p. 113-20
(There may be more views or larger images available for this item. Click on the thumbnail image to view.)
[2]
All faces of the shaft are bordered laterally by a cable moulding but on the broad east and west faces, A and C, there is an additional inner border of knotwork, possibly half pattern B in the worn upper part of face A, but recognisable on the lower stone 2c as simple pattern D on the east face and simple pattern F on the west. On all faces the carving terminates at the bottom in pendant triangles which reach to the edge of the stone.
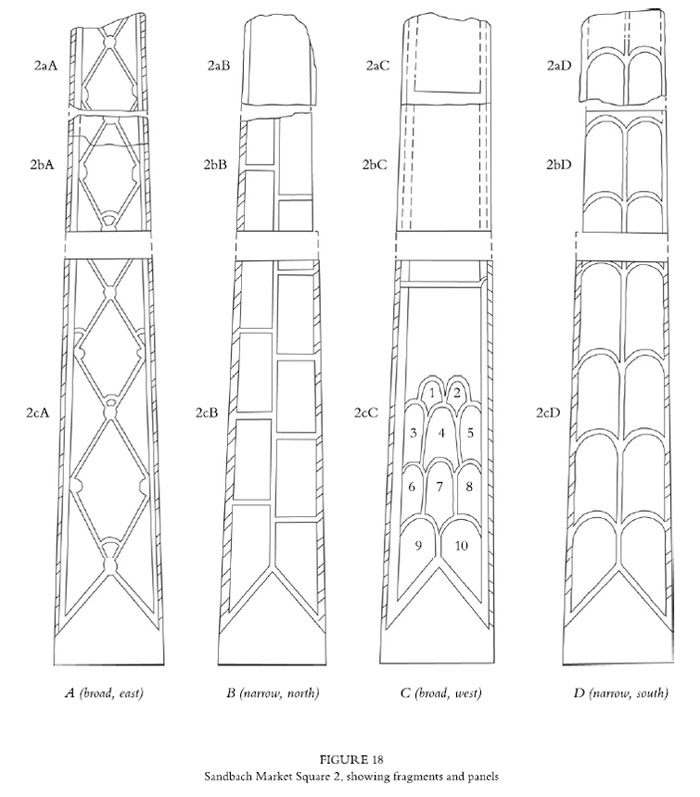
A (broad, east): The ornament on this face is divided by mouldings which cross diagonally to form a series of diamond-shaped rhomboid panels, set centrally one above the other; these panels also define further triangular panels whose other border is marked by the lateral interlace frame. The crossing lines meet in a central boss and there is a further flat boss placed within the side-angles of the rhomboid.
Stone 2aA. All that remains of the framing organisation on this stone is the lower part of one diamond together with the intersecting boss and the outer angles (with bosses) of the diamond below. In the central panel is a backward-turned quadruped, whose body is shown facing right. Detail is now worn but the animal appears to have had a small tail and bent front legs. It is difficult to interpret the carving above the curving neck. Its head probably disappears, swallowed, into a large beast-head, seen in profile, which has open jaws, oval eye, short blunt nose and small curled ear; two intersecting arcs mark the back of the head. This large head seems to be attached to the long curving neck of an animal-form in the partially surviving triangular panel in the upper left; this beast has a single paw below the neck and a more substantial body above.
In the upper right triangular panel is the worn double-outlined profile head and body of a human figure, facing left, who wears a long drooping garment and holds a cylindrical object in a hand which bends across the body.
Stone 2bA. The upper part of this stone is badly worn (though some of the interlace frame survive in the upper corners); in the lower part a single rhomboid frame only survives fragmentarily, with both angle bosses and an intersecting boss at the bottom. That intersecting boss is topped by a small arch linking the converging sides of the diamond. The decoration in the upper part of the rhomboid is too worn for identification. Below, the decoration is clearer but still difficult to interpret. At the centre are two juxtaposed curving stems with two equivalent curves above. Interpretation of the rest of the ornament is disputed. One view would argue that, to right and left of the stem-junction is a large bud; these may emerge horizontally from the main stems or be attached to smaller shoots which spring from the lower part of the frame and pass over (?below) the main stem. Another view (see Hawkes 2002, 166) would interpret the 'buds' as forward-facing human heads, with short hair, attached to diminutive bodies standing on the small arch at the bottom of the panel.
The left-hand triangular panel contains the remains of a ?downward-plunging animal, whose flat broad body splits into two at its upper termination. In the right-hand triangle are two indeterminate zoomorphic forms: in the lower left is a beast's body with long back leg reaching upwards at a right-angle; in the upper right is another animal topped by a swollen terminal and foliate extension.
Stone 2cA. This fragment contains two complete diamond frames, together with part of a third at the top of the stone. The lower part is not decorated but the clasping pendant triangles are well preserved, their inner frames formed by a continuation of the delicate simple pattern D knotwork which flanks the main shaft laterally. The two complete diamond frames have small arcs set above the boss at the junction of the crossing.
In the partially-surviving upper diamond is knotwork which, to judge by its variable width, may represent the terminal of some form of zoomorphic decoration.
In the frame below is a hunch-shouldered forward-facing figure, with thin halo or hair, dressed in a short kirtle with pleated over-garment, who grasps a long thin rod at an angle across his chest; his right arm is bent, his other arm hangs by his side. The folds of the flared over-garment are well marked on the left side.
The lower diamond frame contains another forward-facing figure identically haloed and dressed, standing on the small arch with right arm bent across the chest. The bare knees are well modelled. He also appears to be carrying a long rod across his chest, as in the panel above.
The upper left and right triangular frames carry identical inward-facing figures clad in short, flared, and pleated kirtles standing on an arched moulding which links the interlace border to the rhomboid frame. They have large double-outlined profile heads and each has a large nose and chin. The one visible arm bends across the body to grasp the diamond frame.
The central triangle to the left contains, at the top, a tendril extension of the adjacent arch terminating in a four-leafed bud. Below is a backward-turning beast, set vertically with its front half to the top of the panel. The jaws appear to bite over the back, whilst the extended tail passes over and under the two splayed back legs and possibly links to an extended tongue. The two front legs are also splayed. In the opposite triangular panel is a prancing long-necked animal, its head in the upper angle of the frame, with raised front leg and curling lappet extension to the back of the head; its rear leg reaches into the lower corner of the frame.
The triangle in the lower left contains a human figure, with double-outlined profile head, dressed in a long robe and grasping the lower part of the lozenge frame above with an arm which is bent across his body. Facing him in the balancing panel is a similar figure, the head outline and pleated garment more visible here. The lower parts of both figures sweep back into the corner of the triangle; there are no traces of feet.
B (narrow, north):
Stone 2aB. The single incomplete panel shows two serpentine beasts, their undulating bodies contoured and set side by side, with heads at the bottom of the fragment. The heads are open-jawed; the one to the right still preserving the curling scroll lappet of the eye whilst his companion to the left has a single tooth in each jaw. Emerging from their mouths are tongues of interlace-strand which form a simple pattern B knot between the bodies before crossing the other strand and passing under/over the beast's body above. The strand crossing under the left-hand beast partially penetrates the body at the contour line. Each strand is then tied in a simple pattern E knot before re-crossing the body. Two small pellets are placed centrally between the bodies.
Stone 2bB. The ornament on the upper part of the stone has been lost and the right-hand side has been cut away but, below, are the remains of three figures set in a stepped arrangement of rectangular cells formed by a thin central moulding linked by horizontal borders to the outer arris moulding. In the incomplete upper left frame is the lower part of a profile figure with short flared kirtle and bent knees, facing inwards. Below, on the left, is the upper part of a figure, also facing inwards, with double-outlined profile head; the remains of his hand appear to grasp the inner vertical moulding. Above, and to the right, is a complete frame (badly damaged at the top) containing a figure with a flared and scalloped short kirtle under a pleated over-garment, feet facing left. His left hand is bent across the body and grasps an object (?wand) which disappears behind the central moulding. Nothing is now visible in the partially surviving frame in the lower right of this stone.
Stone 2cB. The ornamental organisation shows a continuation of the rectangular stepped cells of stone 2b, the lowest cells having an angled lower border as the decoration terminates in clasping triangles. The lower part of the stone is uncarved. To the left there are four panels, the uppermost of which has lost its upper border and a small part of its decoration. All contain figures which face inwards. All wear short pleated and flaring over-garments over a kirtle with scalloped hemline, and all walk to the right. They have large double-outlined profile heads with prominent nose and chin. All have a single arm bent across the body which appears to grasp a wand which curves gently from the chin/throat to meet the vertical panel border. The third figure up appears to have a long beard which touches the inner frame; there is a small pellet in the corner of the lowest frame. To the right are four complete panels together with a fragment of a fifth at the top; this latter contains a pair of inward-facing feet. The figures, who all face inwards, have the same features as the balancing set to the left, the third figure up again having a long beard which touches the inner frame. The figure in the lower right frame is contorted by the limited space available, the head tipped back and only one leg shown; there is no clear arm or frond visible on this figure.
C (broad, west):
Stone 2aC. Most of the upper part of this stone has been worn smooth, but at the bottom of the fragment is a horizontal panel of (?figure-of-eight) knotwork bounded laterally and below by a thin arris border. Flanking this, on both sides, is a nimbed forward-facing human head; their bodies below have been largely eroded away. Beneath the interlace panel, to the left, are traces of a further double-outlined nimbed head with, to its right, two small bosses. In certain lights it is possible to trace another forward-facing head to the right of the bosses.
Stone 2bC. The face of this stone is deeply recessed from the surface level of the adjacent stones 2a and 2c, and the cable-moulding borders have been cut away both on this fragment and on the adjacent north and south faces. All carving on this face is thus secondary. The ornament is bounded laterally by a broad flat arris with a narrower moulding within it. Decoration consists of an arched panel containing a worn, oval and flat boss. In the spandrel of the right arch is a delicate foliate decoration. Below is a broad raised horizontal band with traces of five lines of now-obliterated text. Beneath this is curving swag with tasselled terminations hanging from two triquetra.
Stone 2cC. The upper part of this stone is badly worn but there are traces of human heads, set against the border moulding, on either side. Just below the chin level of these figures is a thin horizontal moulding which seems to run into their shoulders; it is possible that, to the left, there is an arm bent across the body.
Below this border moulding there is a single panel which is further subdivided, towards the bottom, into a series of arched cells. This panel is flanked laterally by the cable moulding and a run of delicate simple pattern F interlace which turns inwards and upwards at the base to form the pendant triangles clasping the corners of the shaft. Two-thirds of the way down the vertical runs of interlace, on both sides, the knotwork is interrupted by a double-outlined profile human head; the outline moulding on the right-hand figure terminates in a small curl. The bottom of the stone is uncarved.
At the top of the panel is a three-figure group. The central figure, taller than the other two, is forward-facing, haloed and bearded with arms bent across the body at the waist. He is clothed in a short garment with drooping corners; the knees are well modelled and both feet turn to the right. By his right leg and under his right heel are single pellets. A thick staff-cross extends over his right shoulder; small pellets fill the upper spandrels of this cross. Over his left shoulder is a thin rod which touches a bird above. The bird's everted wing extends into the top corner of the panel and its tail into the plaitwork border, whilst its beak touches the halo of the central figure. Both flanking figures are bearded and haloed with heads that are part-turned inwards. The figure to the left has arched feet pointing to the right with rear leg partly bent. He is clothed in a short flared garment with drooping corners. On his right shoulder are traces of a cloak, whilst the right arm, bent across the waist, carries a small square object. The figure to the right is similarly dressed (though without the traces of cloak). His left arm is bent across the chest and carries a long cylindrical object (possibly with a central groove) which crosses his right shoulder and meets the left elbow of the central figure. Below the left-hand figure is a human double-outlined profile head, upward-turning. A similar feature, perhaps with an attached upper torso, may have been present under the right-hand figure though the carving is here very worn.
Below this group are a series of arched cells (numbered 1–10 in the accompanying plan, Fig. 18), the base of each being formed by the curve of the cell below. Cells 1 and 2 contain the worn outlines of a forward-facing head and shoulders, clean shaven and with halo surrounding the head. Cell 3 contains a clean-shaven, short-haired figure, with double-outlined profile head. The body is somewhat square in shape and the legs are set awkwardly in a kneeling position; one arm is bent across the body. Cell 4 contains a three-quarter length nimbed figure who faces forward. Both arms are bent across the chest, clasping a form whose head is set over the figure's left shoulder; this feature seems to terminate in a haloed disc. Cell 5 contains a figure which is the mirror image of that in Cell 3, though the head is rather more inclined. Cell 6 contains a full-length figure, facing inwards and dressed in a short garment. The large double-outlined profile head is deeply inclined and has the short hair of the other figures on this face. The arm is bent across the body and carries a rectangular object. Cell 7 is badly worn but appears to contain a three-quarter length figure, forward-facing with halo. The ornament in Cell 8 is a mirror image of that in Cell 6 except that the figure carries a cylindrical object across the chest. Cells 9 and 10 contain the upturned heads of two winged creatures, turned towards the centre. Each has a double-outlined profile head. Below the head is a wing filling the apex of the triangle; in each case a veiled hand emerges from the wing towards the chin.
D (narrow, south): This face is flanked by cable mouldings which turn upwards at the base to form the clasping triangles at the corners of the shaft. It is divided vertically by a continuous moulding which separates a series of arched panels set alongside each other. The curved arch of each frame acts as the base of the panel above.
Stone 2aD is badly worn on the right side, though an arch and traces of two figures are vestigially present. To the left are the remains of two fragmentary panels, divided by an arch. At the top is the lower part of a profile figure with short flared kirtle and feet facing left. In front of him is a staff. In the incomplete panel below is a double-outlined profile head, facing inwards, with a marked nose.
Stone 2bD is badly worn at the top but below are four balanced panels, the two uppermost virtually complete and the other two incomplete. In the upper left panel, below the arch, is a figure whose forward-facing head is part-inclined inwards. The body, clad in a short garment, is seen in profile and his head is haloed. The legs face right and the feet are arched. One arm is bent across the body, holding a thin rod across his right shoulder. In the facing panel is a mirror-image figure also carrying a staff; here the left arm is more clearly bent across the body, grasping a staff which rests on the man's left shoulder.
The fragmentary lower left panel contains a forward-facing head, set in hunched-up shoulders, with short hair and a halo above; the facial features are well marked. The balancing figure to the right has a double-outlined profile head. He faces outwards and has a marked nose and chin, and it is possible that he carried a staff across his shoulder.
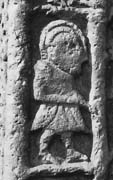
Stone 2cD carries three complete pairs of arched panels above a pair of tapering arched panels which form the pendant triangles clasping the corners of the shaft. The lower part of the stone is undecorated. The upper left panel contains a figure with double-outlined profile head, in a pleated, flaring, short garment, marching to the right. His right arm is bent across the chest and grasps a rod which touches the lateral border behind him. In the upper right panel is a similar figure, also walking to the right; the lower part of his rod touches the border moulding.
Below, to the left, is a figure whose feet are splayed and whose body is thus shown as facing the viewer. The head, however, faces to the left and is surrounded by the doubled outline. Clad in a short, flared and pleated garment, his arm is bent across the body to hold an upright staff against the lateral border moulding. The figure in the panel alongside to the right is identical except that his feet both point to the right.
Below, to the left, is a forward-facing figure, with double outlined moulding running round the head, clad in a short flared kirtle and with feet planted wide apart and splayed. Both arms appear to be bent across the body; a deep scallop line traversing the upper chest may indicate a thick coat or collar. Between the feet is a small pellet. The figure to the right is similar, though the head is more inclined and in this case he clearly carries a rod which passes over his right shoulder. Again there is a pellet set between the wide-splayed legs.
Each of the pendant triangles is occupied by an upward-turning winged figure, with double-outlined profile head; multiple-outlined wings curve below their heads and sweep into the corner of the triangle. Beneath the chins of both figures emerges a veiled hand, the veil drapery falling alongside the wing.
(See Chapter IV, p. 23.)
(a) Dating
The detailed analysis of ornament suggests the early ninth century as the most likely period of production. The carving is clearly closely related to Sandbach Market Square 1 and cannot be far removed from its c. 800 date. The Trewhiddle-style animal ornament on face A points in the same direction (see below) and so too does the rhomboid organisation of the same face, which seems to reflect metalwork prototypes of the late eighth or ninth centuries (see Chapter IV, p. 26). Hawkes (2002, 128–37) has argued — on the basis of the animal ornament, some seeming misunderstandings of forms more coherently displayed on Sandbach (Market Square) 1, and its more stylised figural art — that Sandbach Market Square 2 is probably the later of the two, though it is difficult to assert this with total conviction.
(b) Iconography
This section draws heavily on the recent book-length analysis of the monument by Hawkes (2002; see also Hawkes 1989; 1995a; 1997a; 1998; 2001a; 2003a; 2003c).
A (broad, east). The interlace surround to the east and west faces provides an elaborate additional frame (Ills. 273, 275, 279, 285, 287). Though such frames are found on ambitious slabs in Scotland (Allen and Anderson 1903, iii, figs. 72A, 258A, 305A, 322B), the only parallels for this kind of border on a cross-shaft within Insular sculpture are provided by the ninth-century crosses at Irton in Cumberland and Closeburn in Dumfriesshire where it is also limited to the broad faces (Bailey and Cramp 1988, ills. 355, 357; Allen and Anderson 1903, iii, fig. 458). The intrusion of masks into this frame is unparalleled, though there is a mask and a figure with interlace body on Sandbach St Mary 5 (Ills. 287, 292, 310).
We have already seen that the rhomboid panel division on this face reflects a metalwork form (Chapter IV, p. 26). It may also carry a further significance, because Hawkes, following up work by O'Reilly invoking both Carolingian and earlier Hiberno-Latin exegesis, has drawn attention to the use of such frames in Insular and other art to 'articulate the complex of ideas surrounding the absolute harmony and universality of God's nature and Christ's salvation' (O'Reilly 1998; Richardson, H. 1996; Hawkes 2002, 97–101; id. 2003a, 8–10; see also Heysham 9, p. 206). It is, however, difficult to extend this argument beyond the possibility of such symbolism, though the variety of human, animal and scroll forms enclosed within these frames might have been intended to reflect the universality of the created world.
The quadruped in the uppermost lozenge has its head swallowed in the jaws of a long-necked animal emerging from the left (Ill. 279). Animal encounters elsewhere normally show the swallowing of a snake or form part of depictions of Hell which involve man-eating beasts (e.g. Henderson and Henderson 2004, ills. 102, 103; Henderson, I. 1997, 30, 34, 44–50; Allen and Anderson 1903, iii, figs. 66, 258C, 305A). There seems to be no parallel for this Sandbach combination, though the victim-animal, with bent legs and tail over its back, is like many in Anglian scrolls. The beast in the triangular panel to the right on stone 2c, with splayed back legs, is not only very close to the animals on stone 1d of Sandbach Market Square 1, face D (Ills. 271, 285, 289), but is here given the triangular body familiar from beasts of ninth-century Trewhiddle art (Mac Dermott 1955, fig. 11; Wilson and Blunt 1961, figs. 1, 5). Its companion beast to the left, adopting the backward-biting S-shape, has been justifiably compared by Hawkes with animals on ninth-century strap-ends (Hawkes 2002, 96, fig. 3.2; Webster and Backhouse 1991, nos. 248a, 249a–c; Wilson, D. M. 1964, fig. 3).
The human forms on this face can all be paralleled by those on the northern Market Square shaft, no. 1. Thus the two in the lozenges on stone 2c have kirtles with drooping hems and carry a rod across their chest in a manner similar to figures on face A of Sandbach 1 (Ills. 266, 285). The profile figures, with swept-away bodies at the bottom of the shaft clearly relate to those at the bottom of face B of the north shaft (Ills. 259, 290), whilst the worn figure in the upper right corner of this face has an arm bent across his chest in the universal fashion of the figural decoration on the north cross (Ill. 289).
B (narrow, north). The overall composition clearly relates to face B of Sandbach Market Square 1 (Ills. 270, 274, 284, 286). Both are topped by downward-facing ribbon animals and consist of a series of double-outlined profile figures set in a stepped double row of rectangular panels. There are however differences. On Sandbach 1 there is one serpentine beast; on the south shaft there are two. On the north shaft the horizontal frames do not join the arris edge; on the south shaft they do. On the south shaft there are at least twelve figures whilst on the north there are only eleven — and one of those bends over the top of the vertical moulding dividing his fellows below. Whilst this all suggests that the one shaft is copying the other (or both are dependent on a common model), the meaning of the composition need not be the same on both crosses. It could be argued, for example, that Sandbach 2 has sufficient figures for these to be apostles. Against that suggestion, however, must be set the fact that curving fronds are not an orthodox apostolic symbol; books or scrolls are more usual. On balance, it seems likely that this face derives from the ornament on the adjacent cross but that the distinctive ladder element has been lost in the copying.
The ribbon beasts, with knotwork emerging from their tongues to interlace and knot between and across their bodies, are a familiar Insular form of ornament. Early examples can be found in the eighth-century art of the Durham Cassiodorus and St Petersburg [Leningrad] Gospels (Alexander 1978, ills. 74, 191); in sculpture, the ribbon beast at Checkley in Staffordshire, whose tongue extends into a triquetra knotted strand which encompasses its body, and which also uses a spare boss, is probably a later, tenth-century, derivative of this Sandbach composition (Pape 1946–7, 29).
C (broad, west). The surviving ornament on the lower stone of the west face consists of three standing nimbed figures placed over a nest of small characters set in arched niches (Ills. 287, 291–2). This seemingly confusing ornament has been convincingly interpreted by Hawkes (1995a; 2002, 103–15) who rejects the traditional interpretation of the upper part of this composition as representing the Last Judgement or Final Resurrection. She argues, first, that the mass of arched figures, below the standing three, are not connected to the trio at the top of the panel but represent at least two other scenes. Secondly, she notes that the usual depiction of the Last Judgement (well exemplified in Irish sculpture: see Harbison 1992, i, 297–300) shows Christ as Judge, flanked by trumpeting angels and a group of the judged and not, as here, accompanied by figures with scrolls or books. Thirdly, whilst recognising that the Osiris-like pose of the central Sandbach figure resembles that of Christ standing in Judgement on Irish carvings, this pose is adopted by other figures of authority in Insular art such as the portrait of Luke in the Lichfield Gospels (Alexander 1978, ill. 82). Moreover the Sandbach figure does not hold the double-barred cross or floriate rod seen on the Irish Judgement carvings; rather he is carrying a simple cross and a wand that passes before, or behind, a bird.
Disengaged from the figures below, and no longer identified as part of a Judgement scene, the group of three figure can thus be seen as virtually identical — in pose, robes, haloes, pellets and the presence of a bird — to the (otherwise) unique realisation of the Transfiguration scene on face A of Sandbach Market Square 1 (Ills. 266, 291), with the transfigured Christ flanked by Moses and Elijah, the bird representing the Voice of God heard at the revelation. There are obviously differences between the two crosses. Christ, for example, is here given an additional wand and Elijah's scroll is simplified from the double cylinder of Sandbach 1 to the usual cylindrical form carried by figures on both shafts. In addition, the busts below on Sandbach 2 do not figure on Sandbach 1; if they belong with this scene, and not (as is more likely) to the Adoration depiction beneath, they may be reduced versions of the onlooking disciples who normally appear in this composition — a reduction in keeping with the treatment of the Magi on Sandbach 1 and one which can be paralleled on an eighth-century Syrian pectoral cross (Schiller 1971a, pl. 456). Such differences between the two scenes on these crosses may simply reflect a modification in copying of Sandbach 1; and in the particular case of the double set of cross and wand this might be an attempt, given the association of cross-sceptres with authority in Insular art, to stress Christ's divine authority. Equally it could reflect an independent handling of the same model as was used by the sculptor of the northern cross.
Below the Transfiguration scene is a group which represents the Adoration of Mary, holding a diminutive nimbed Child, by two kneeling profile figures; the two busts set above may be part of this scene (Ills. 287, 292). This represents a version of a long-established Christian iconography in which the Mother of God is flanked by either archangels or saints (Hawkes 1995a, 217; id. 1997a; id. 2002, 111–12). The kneeling position of the subsidiary figures here is admittedly unusual in such scenes but is not unparalleled: the early eighth-century depiction at Old St Peter's in Rome showed just such a pose (Nordhagen 1965, pl. XXIIb; Hawkes 2002, 112). In this interpretation the busts above would be reduced versions (similar to the reduction of the Magi on Sandbach 1) of other attendants who figure in this scene. The niche division between the various participants can be seen as part of the general Sandbach tendency to compartmentalise, or as a reflection of models which set the figures under arches such as the early sixth-century fresco representation at S. Maria Antiqua, Rome (Nordhagen 1968, pl. XCIII); it may, as we have seen, also be a response to metalwork techniques (Chapter IV, p. 26). Hawkes (1997a), in her full analysis of depictions of the Virgin and Child in Britain, emphasises that this form, with both Virgin and Child forward facing, is a dominant type in Insular (particularly Anglo-Saxon) representations and argues strongly for an Iona source of the depiction (see Fisher 2001, figs. 24B, 25, 70B).
The final group of three, together with the two winged half-length figures, at the bottom of the panel are now too worn for certain identification (Ill. 292). The two flanking figures carry a book and a scroll, as do saints and prophets flanking Christ in other scenes on the Sandbach crosses. The central figure is thus likely to be Christ and the theme perhaps that of his Veneration, which is a type well evidenced from at least the fourth century in Christian art (Hawkes 2002, 115). This would fit well with the angels below and with the fact that the busts in the framing interlace are here set in profile looking in towards the scene. If this is accepted, the sequence on this face presents us with a statement of Christ's divinity, its recognition and consequent veneration.
D (narrow, south). The south face now carries some fourteen figures set in parallel in arched niches on either side of a central moulding; originally there were certainly others at the top of the shaft. At the base are truncated winged angels in the pendant triangles (Ills. 276, 284, 288). They differ from the figures on the north faces of both Market Square shafts in their framing, their pairing and in the fact that they mix profile and full-face varieties; nor do they consistently face in towards the centre. They carry a variety of attributes, predominantly wands held across the shoulder or in front of them. Interpretation of these figures is problematic. There are clearly more figures than would be appropriate for depictions of the apostles, whilst illustrations of the Old Testament prophets usually show them holding books or scrolls (Hohler 1956, 396–401). The latter objection applies equally to any interpretation which sees them as unspecified saints.
The most plausible interpretation is that they represent the ancestors of Christ (Hawkes 2002, 118–20). If so, then this is a very early version of a theme which is rarely depicted before the eleventh century, though literary interest and manuscript-illumination emphasis on Christ's genealogy is well evidenced from an early date (O'Reilly 1994, 344–53). The tenth-century Boulogne Gospels offers perhaps the closest parallel in depicting thirty-six such ancestors, some of them holding rods and placed in arched cells (Temple 1976, ill. 147). If this is accepted then it must be recognised that the Sandbach artist, perhaps because there was no well-established iconography on which he could draw, has illustrated his theme by drawing on a standard set of Sandbach figures and added adoring angels in the pendant triangles which, though iconographically appropriate, did not become part of this scene as it ultimately developed.
Figures in arches are a common motif in Mercia (witness Hedda's Tomb at Peterborough, Castor, Fletton, Breedon, Bakewell, Bradbourne and Eyam: Cramp 1977, figs. 56, 57b, 57c, 58a, 58c, 59; Hawkes 2007b, figs. 24, 26, 27), but the Sandbach system of parallel double arches on a shaft, without any pretence of architectural features, seems unrelated to these other carvings — and part of a general tendency to compartmentalise into a series of individual frames, which include rectangular, triangular and rhomboid shapes.
If correctly interpreted this face of the cross thus emphasises Christ's human and divine descent, on which the Church was founded.
Summary
As with the larger cross alongside, the figural sculpture of this monument offers a rare insight into the range of iconographic types available in northern Mercia in the early years of the ninth century: forms which had been rarely used since early Christian times; anticipations of types whose popularity would only emerge centuries later; and inventive adaptations of existing models. Contemplative rumination on the implications of the individual events depicted, informed by the patterns of the liturgy and patristic commentaries, must have made both crosses particularly rich in meaning; the juxtapositioning of scenes and their echoing of each other in organisation, gesture and figural drawing would only deepen this understanding. It has been argued that the themes of recognition of Christ's divinity and of the authority of the Church (which are present on both shafts) are not ones primarily appropriate to a monastic audience (Higham, N. 1993b, 168). This seems to take too narrow a view of the nature of Anglo-Saxon monasticism.
[1] The following are unpublished manuscript references to the Sandbach Market Square stones: BL Add. MS 37547, items 713–23; BL Add. MS 5830, fols. 33v–35r; BL Add. MS 9461, fols. 122v–127r; Manchester Public Library, Hibbert Ware S. MSS: Msf 091 H21, vol. 6, 55–7.
[2] In the following description the term 'double-outlined profile head' is used to describe a recurrent Sandbach form in which a human head is surrounded by an outer moulding which runs from the nose to the nape of the neck. Within this is a further distinct moulding flanking, or laid on top of, the head. For the argument that these represent, respectively, halo and hair, see Chapter IV, p. 23.
