Select a site alphabetically from the choices shown in the box below. Alternatively, browse sculptural examples using the Forward/Back buttons.
Chapters for this volume, along with copies of original in-text images, are available here.


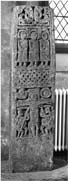
Object type: Lower part of cross-shaft [1]
Measurements: H.143 cm (56.2 in); W. 38 > 31.5 cm (15 > 12.2 in); D. 22.8 > 19 cm (8.9 > 7.5 in)
Stone type: Medium-/coarse-grained, massive yellow sandstone
Plate numbers in printed volume: Pls. 7.25-26, 8.27-28
Corpus volume reference: Vol 1 p. 41 - 2
(There may be more views or larger images available for this item. Click on the thumbnail image to view.)
The shaft is edged by a double flat-band moulding.
A (broad): This south face is divided into four panels, each contained within a grooved horizontal moulding. (i) Two creatures, which look like long-necked birds or griffins, have curved beaks and long double-incised necks with pelleted ornament inside. From the back of their heads spring trailing extensions which cross between them and pass over and under the body of the creature opposite. (ii) Three frontal figures. They each stand in an identical posture with the right hand bent, arms across their chests and their feet turned to their right. They have oval heads framed by joined haloes. Their bodies are block-like and detached. They wear calf-length belted tunics. (iii) A panel of eight-strand plain plait. (iv) A Crucifixion scene. The cross is centrally placed and reaches to the limits of the frame, although it is cut free at the top. Christ stands upright and frontal, with his head turned left. His hair is short but he may be bearded. His arms are held stiffly horizontal with thumb upraised. He seems to wear a tunic-like garment which reaches to the thigh. Above the arms of the cross are the sun and moon: the moon on the left is shown as a rough crescent with a face, the sun as a roundel with the face centrally placed. Below are the profile figures of the sponge- and cup-bearer, both shown in crouching `active' positions, with their legs braced on either side of the shafts they hold. Both appear to be bearded, but it is not possible to determine the details of their garments, although they are clearly bare-legged.
B (narrow): Much of this east face has been chiselled away, but parts of two panels of interlace survive, framed in an outer flat-band and inner roll moulding. (i) Two registers of split plait connected by joining two circuiting strands. (ii) Three registers of complete pattern B with the beginning of a fourth.
C (broad): This north face is divided into four panels by broad flat horizontal bands. (i) Two separate frontal figures with feet out-turned. They each hold crosses in both hands. They have oval faces with lightly grooved round eyes and nose, and small slashed mouths. They possibly have haloes. They wear calf-length pleated skirts. (ii) Two more block-like figures, frontal, with feet out-turned. The one on the left holds a flower-like cross in his right hand and a book in his left, and the one on the right is his mirror image. They have oval faces surrounded by rope-like haloes which are twisted and joined. The figure on the right wears a patterned skirt. (iii) Three figures in a similar posture, although their figures are even more block-like. Each holds a book in his upturned hands which emerge from a loop of drapery at the waist. Their faces are irregular ovals, the features lightly incised as on ii. Their skirts are pleated. (iv) A panel of four-strand plain plait.
D (narrow): This west face is divided into three panels by grooved horizontal mouldings. (i) Part of a panel of eight-strand plain plait. (ii) A figure crucified upside down. His stiff frontal posture is the same as the other figures on the shaft, as is his head type and clothing. His outstretched arms cannot accommodate themselves easily to the narrow panel, so that the shoulders and large hands run into each other. (iii) A larger scale panel with two S-shaped ribbon animals. Each has one front leg upraised and one back leg passes through the mouth of the other. Their ear extensions pass over and under their bodies, twisting in a triangle and a diamond between them, and become the tail extensions of the opposing beast. Their lips are twisted, their bodies are lightly double-outlined, and their eyes are lentoid.
This is an impressive piece of carving, confidently laid out, deeply carved using a chisel, and drawing on a wide ornamental and iconographical repertoire. The distinctive split plait on face B is found on 5 and on stones from Chester-le-Street (no. 1), Durham (nos. 1 and 11), Jarrow (no. 4), Woodhorn (no. 1), and on a newly discovered fragment (co. Durham, Unknown Provenance 1), possibly originally from Aycliffe (Adcock 1974, 331, fig. 45). The other plait on face B occurs on Durham 1, and Tynemouth 5. The S-shaped ribbon animals are also found on Tynemouth 1 and 4, and the St Oswald's cross, Durham (no. 1) (Cramp 1966, 119-24; Cramp 1967b); the long-beaked birds are also paralleled at Woodhorn (no. 1). All these parallels clearly place it in the Lindisfarne/Durham tradition. The little horizontal panels of plain plait may be a more generalized feature, but their origins too could have been from Lindisfarne/Norham. It is possible that the figures of saints holding books or crosses may have been derived from copying the near-by but much earlier cross from Auckland St Andrew (no. 1). However, this flat figure treatment is also seen on Norham 2, together with a panel of plain plait. The crucifixion of St Peter, since this is plausibly the identity of the figure on face D, is not paralleled elsewhere in sculpture, but, like the crucifixion of St Andrew at Auckland, it could have been easily adapted from a model of the Crucifixion of Christ. Rather strangely, neither of the crucified figures on the Aycliffe cross has a halo. The Crucifixion of Christ seems to belong to the same tradition as that at Alnmouth (no. 1). The grotesque postures of the cup- and sponge-bearer may however be period features, since there is a tendency to render these figures in a bestial manner in Crucifixion scenes of the Anglo-Scandinavian period. Coatsworth (1978b, 116) suggests new models for the Crucifixion in eastern Northumbria north of the Tees in the tenth to eleventh century. Despite the confidence and competence of carving of this cross and its use of early motifs, it cannot be very early. The Anglo-Scandinavian type of animal, with its distinctive twisted lip, and the binding together of the flat block-like figures, both betray a knowledge of Anglo-Scandinavian art. The use of Lindisfarne/Chester-le-Street/Durham patterns clearly betrays a link with that tradition (Introduction, p. 32) and since the distinctive split plait is found at Chester-le-Street (no. 1) and Jarrow (no. 4) as well as on Durham 1 and 11, and since the confident exact style of cutting is more like Durham 11 than Chester-le-Street, Jarrow or Woodhorn (no. 1), one might put this piece around the time of the removal to Durham of the Chester-le-Street community.
