Select a site alphabetically from the choices shown in the box below. Alternatively, browse sculptural examples using the Forward/Back buttons.
Chapters for this volume, along with copies of original in-text images, are available here.


Object type: Incomplete cross-shaft
Measurements:
H. 153 cm (60.2 in); W. 40 < 55.5 cm (15.7 < 21.8 in); D. 28 < 33.5 cm (11 < 13.2 in)
The secondary hollow on face C measures: L. 137 (54 in); W. 28 < 36 cm (11 < 14 in); D. 20 cm (7.8 cm)
Stone type: Sandstone, pollution blackened, medium grained, quartzose and quartz cemented. No obvious bedding indications. Upper Carboniferous, local Millstone Grit Group, possibly Rough Rock. [G.L.]
Plate numbers in printed volume: Ills. 692-5
Corpus volume reference: Vol 8 p. 246-9
(There may be more views or larger images available for this item. Click on the thumbnail image to view.)
A tapering cross-shaft of rectangular section with rounded angles. The elements of the design are humped rather than modelled, and the background is cut away quite deeply, and dressed flat. The lowest 23 cm (9 in) of the shaft on all faces is also dressed flat.
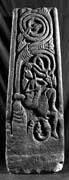
A (broad): On the left is the root stem of an impressive spiral scroll, with a triple binding just above the root and a second with five bindings about three-quarters of the way up the surviving panel. From this last springs one volute which spirals down and terminates in another triple binding and one long and one short pointed grape bunch, while two further long and one rounded berry bunch develop from points along the curve of the volute. The tendrils with the two long bunches interlace with the twists of the spiral. A second large volute forms a triple spiral filling the remainder of the face above, terminating in three grape bunches, one filling the internal space of the spiral, the other two lacing through the twists of the spiral to fill a spandrel. The stem has a secondary five-fold binding on its upper, outer curve, clearly the springing for another volute above: the bud from this binding can be seen in the upper left corner. A bud with three scooped pointed leaves fills the spandrel between the two surviving volutes, springing from the same five-fold binding.
Beneath the lower volute, an archer kneels on the right-hand frame, his head, with pointed chin, drilled eyes and a cap of curled hair (which interrupts the stem of the main scroll) turned outwards. He wears a long-sleeved tunic with a round neck, almost naturalistic wrinkles on the sleeve conveyed by lightly incised lines parallel to the cuff, and a short skirt which is slightly undercut and has incised fold lines vertical to the hem. His right foot clearly has a shoe. He points his arrow towards the lower of the two volutes of the scroll. Beneath him a second vine stem grows next to the main trunk. This starts with a four- or five-fold binding, and there is a second quadruple binding halfway round the curve of a single small volute, terminating in a berry bunch. This face is particularly deeply carved and heavy looking.
B (narrow): A sinuous spiral scroll with four- or five-fold bindings, from which spring four alternate facing volutes terminating in round berry bunches or leaf-flowers. Paired leaves with a bud between them spring from the three bindings, and interlacing tendrils ending in pointed leaves drop from the outer curve of the three upper volutes. The scroll continued on above this: part of the next volute is just visible.
C (broad): Hollowed out, possibly for its reuse as a trough, but an earlier reuse as a coffin is also suggested by the head-shaped depression at the narrow end. There is a drain hole in the side near the bottom right, probably from its use as a trough, and traces of plant-scroll on the upper edge.
D (narrow): There is also a scroll on this face but it begins with two registers of interlace, turned pattern C, slightly damaged in the bottom right corner. Centred on this stands a plant stem which starts off as a bush-scroll with two pairs of outward curling tendril springing from single bindings. These elegantly curl back over themselves, ending in double bindings from which spring triple or double pointed leaves (one clearly scooped) which fill the space below the volutes: each volute in addition produces a single leaf or bud which fills the space between volute and edge moulding or volute and stem. Above the second binding, the stem develops into a spiral scroll with two alternate facing volutes springing from a triple binding. The volutes end in berry bunches. The lower volute has a third berry bunch depending from a turn in the spiral to fill the spandrel on the left; the upper has three terminal bunches, one of which crosses the volute to fill the spandrel on the right. A paired leaf with a bud springs from the binding to fill the spandrel between the volutes.
The Sheffield shaft has obvious Peak District connections, and Ryder (1982, 118–19) pointed to close parallels for the vine-scroll on the shaft from Eyam, Derbyshire (Routh 1937, pl. XIV), which he thought possibly even the work of the same hand. Discussion as to where this cross came from originally centres on its likeness to the Peak District crosses, of which the Eyam shaft is one — but the geographical location of Sheffield is pretty much in the same area, obviating the need for an eighteenth- or nineteenth-century move. On the other hand, the Sheffield shaft shares a tendency found more commonly in the northern part of west Yorkshire, to change from one pattern to another (see for example Ilkley 1, faces B and D: Ills. 336, 338). The bush-scroll with its twisted volutes and drooping leaves is also a feature of West Riding sculpture: see for instance Little Ouseburn 5 (Ill. 535), and examples on Dewsbury 7 and Thornhill 6 (Ills. 212, 214, 747). In some ways, therefore, the shaft could be seen as typical of a border location.
The most mentioned aspect of the shaft is the figure of the archer at the bottom of face A, usually as a comparison in discussions of this figure on other sculptures or artefacts: most commonly indeed in relation to the appearance of an archer figure on the Ruthwell cross (Cassidy 1992, pls. 11, 12). This figure is also found on the Derbyshire Peak crosses of Bakewell and Bradbourne (Routh 1937, 5–7, 18–19, pls. IIa, VIII a–b), both closely related to the Eyam cross, with which we have already seen the Sheffield shaft has been compared; and on a cross-shaft at Auckland St Andrew, co. Durham (Cramp 1984, 37–40, pl. 5.12 and 14). A fragment of a panel from Hexham, Northumberland, which is either Roman or seventh-century Anglo-Saxon (ibid., 185–6, pl. 179.961), has a clearly naked figure drawing a bow within the strands of a scroll: whatever its date, it would appear to show that the motif of the archer/hunter was available very early. The Ruthwell and Auckland St Andrew archers are clearly both standing figures: that on Ruthwell is empanelled and is associated with other figural scenes, not a vine-scroll; the Auckland St Andrew example is on one of the narrow faces of the shaft, and stands on the root of a vine-scroll, shooting up into it. The Bakewell and Bradbourne archers are both at the bottom of scroll-patterned narrow faces of shafts. The Bakewell figure survives only as a bow, and the archer at the foot of one face of the Bradbourne cross also survives only as arms and hands grasping a bow (Routh 1937, p. VIIIa): Routh speculated, however, that the reclining figure at the base of the opposite face is also an archer, although here it is the bow (if there was one) which is missing (ibid., 18, pl. VIIIb). None is clearly a parallel to the kneeling Sheffield figure, which is alone in having the archer/vine-scroll theme on a broad face of a shaft. The closest parallel is in fact an eleventh- to twelfth-century ivory pectoral cross, which Raw (1967, 394, pl. 45a) believed could have been based on a ninth-century Anglo-Saxon original. On it, the archer leans back, one leg folded beneath him resting on the left border, enclosed in and supported by the vine-scroll through which he shoots up at a bird enclosed in the scroll above him. In this case the archer is at the centre of the cross, with the Lamb with cross and book on the opposite face. The archer figure associated with a vine is clearly an important and long-lasting motif, for which no final explanation has been found.
Two detailed studies of the theme, which come to opposing views as to its meaning, are those by Raw (1967), in relation to the ivory, and Farrell (1978b), in relation to the Ruthwell cross, both of whom provided a survey of other published interpretations. These include the purely secular, an image of hunting or of secular force, an explanation which both writers reject. Secular themes are rare on pre-Viking cross-shafts, although there are one or two possible examples, such as a scene with two figures on a shaft from York, St Mary Bishophill Junior 1 (Lang 1991, 83–4, ill. 216). None however is associated with the vine-scroll, as is the case with all examples of archers save for Ruthwell. Religious interpretations are sharply divided between those which see the archer as a positive figure, and those which see him as a figure of evil possibly representing the outcast Ishmael. Raw (1967, 393) was a proponent of the former, citing Augustine to show that early commentators interpreted 'the arrows of Psalm 120, 5, as the words of God shot at us to arouse our love, [while] Hrabanus interprets the archer as the symbol of the preacher'. She also explored exegesis identifying the first of the horsemen of the Apocalypse (Revelation 6, 2), who is described carrying a bow, with the preaching mission of the church. Farrell (1978b) on the other hand, argued for the archer to be seen as an inimical figure, symbolic of the attacks of evil, basing his discussion on Psalm 90 (91). In this psalm, God is represented as a winged creature, beneath whose wings the just man can find protection from snares sent by hunters, 'the arrow that flies by day', and from plague and pestilence; and he too finds evidence of texts, including some in the commentaries of Bede, which show that this darker view of archer and arrows was probably widely known in pre-Viking Northumbria. In this view, the eagle which appears on the upper arm of the Ruthwell cross symbolises Christ.
The two interpretations are clearly mutually incompatible, but it is not impossible that both existed: they are after all associated with different texts. Farrell argued that several images in Psalm 90 (91) and the texts associated with it in the liturgy made his explanation of the archer figure (in this instance alone not directly associated with the vine) the most likely one for the archer on the Ruthwell cross. It is not necessary to assume that this explanation holds true for all other instances of the theme, however. Raw's interpretation would be appropriate for a cross representing the teaching mission of the church — and this theme in fact appears to have been popular in the West Riding: there are crosses, such as Dewsbury 1–3, for example, on which it appears in the form of the Traditio Legis (p. 130; see also Chap. VI, p. 62). It is probable that the apostles were represented on the base of the St Andrew Auckland cross, which suggest this might have been part of the overall theme of that cross too (Cramp 1984, pls. 1.1–5.15). The association with the vine, itself a symbol of Christ, should also be taken into account. The archer figures on this Auckland cross and on the Sheffield shaft are rather beautiful figures, drawn to show them as beardless young men, with attention to detail of hair, features and dress; and while this does not mean that they could not represent evil, it is does not detract from the idea that they are intended to convey a more positive message.
